Please note: This is a guide only and is not intended to include all aspects of the conversion and the processes on how to do it.
Before You Start
Disclaimer: We recommend this modification be used for off-road use only. If intended for an on-road vehicle, it is the responsibility of the customer to confirm the legalities with their local transport authority within their state or territory. We also recommend that any modifications be done by a qualified mechanic.
IMPORTANT: Read and understand what is involved before proceeding with the conversion. This is not a 5-minute job.
What is a 5-stud conversion?
We call it a 5-stud conversion, but it is in fact much more. It not only opens you up to hundreds of wheel options, but it upgrades your front brakes, rear brakes, and your front suspension.
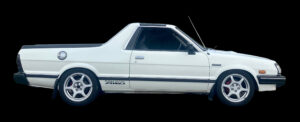
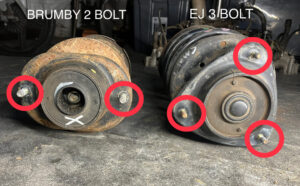
The term “5 studs” is in reference to the number of wheel nuts/studs per wheel. The Subaru Brumby, and L-series, (EA Series) have 4 per wheel and the more modern Subarus (EJ Series) have 5 per wheel. Hence the commonly used name “5 stud conversion” by enthusiasts.
This writeup is a basic guide to what is involved to change your Subaru Brumby to 5 studs. It also includes notes for also converting Subaru L-series to 5 studs (found in blue throughout the guide).
Here at Subarino we also sell a kit, excluding donor vehicle parts and CV components. This will make the conversion much easier. Click here for more info.
Why Should I Do It?
As with all conversions, there are always pros and cons. Below, we discuss them and how they can benefit you and your build.
The Pros
- Many more wheel options – 5×100 stud pattern instead of old EA81/EA82 4×140
- Camber adjustable front suspension – improving tyre wear and handling.
- More choices of front suspension – Raise/Lower/Stiff/Soft/Aftermarket.
- More suspension travel in the front if using EJ struts – Better for offroad.
- Upgraded rear brakes from drum to disk brakes – brake performance increased.
- Upgraded front brakes to larger disks – brake performance increased.
- Rear handbrake instead of front handbrake – preferred by many vehicle owners.
- Front wheel bearing upgrade – harder wearing and longer lasting design.
- Wider parts availability for many years to come.
The Cons
- No longer original
- Custom CV joints/axles are required.
- Initial cost
What Do I Need?
IMPORTANT: There are many variations of EJ 5 stud vehicles, but they are not all compatible with this conversion.
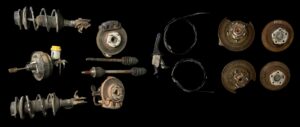
Essential Donor Parts Required
- Front shocks, struts, spring assembly. Including hardware.
- Front steering knuckles, hubs, bearing assemblies. Including hardware
- Front brake hoses, rotors, and brake caliper assemblies.
- Rear brake rotors, hand brake components, brake backing plate, and brake assemblies. (Including Hardware)
Optional Donor Parts Required
- Brake Master Cylinder (4 port, 3 port, 2 port) (Blanks and adaptors Included in Subarino kit.) – See chapter “BRAKE MASTER CYLINDER” here
- Brake Booster. – See chapter “BRAKE BOOSTER” here
- Hand brake cables and lever assembly. (Included in Subarino kit.) – See chapter “HAND BRAKE” here
- CV axles/joints – See chapter “FRONT CV/AXLES” here
Essential Custom/rare parts required
- Rear 5 stud hubs from a Subaru XT6 from America or custom-made. (Included in Subarino kit.) – See chapter “REAR HUBS/BRAKES” here
- Custom-made rear brake hoses. (Included in Subarino kit.) – See chapter “REAR HUBS/BRAKES” here
- Rear brake hose mounts (Included in Subarino kit.) – See chapter “REAR HUBS/BRAKES” here
- Rear brake caliper locating ring or plate. (Included in Subarino kit.) – See chapter “REAR HUBS/BRAKES” here
- Hand Brake cable relocation parts and mountings. (Included in Subarino kit.) – See chapter “REAR HUBS/BRAKES” here
- Control arms with modified ball joint holes. (Can be arranged by Subarino if required) – See chapter “REAR HUBS/BRAKES” here
Best Donors
- For non-lifted: Early Impreza (including WRX) non-ABS models 1994 – 1998 (Can use the struts and springs, All rear brakes are compatible, can use the brake master cylinder and the brake booster)
- For 2-inch lifted: SF Foresters 1997-2002. (Can use the struts and springs, All rear brakes are compatible. Non-ABS models can use the brake master cylinder but not the brake booster)
- L-series is similar to the above mentioned, except you do have more options due to being able to use the larger diameter springs and top spring seats. These are found in Subaru Libertys and Outbacks of the same era. Brake master cylinder compatibility is complicated. – See chapter “BRAKE MASTER CYLINDER” here
General Donor Rules
- Early Subarus 1989 – 2001 without ABS should have a compatible brake master cylinder. (check ports first)
- Early Subaru Liberty and Impreza 1989 – 1994 should have a compatible brake booster. (check diameter first)
- Subaru Impreza 1993 – 2007 struts, shocks, springs, and spring hats are the best for a Brumby without a lift kit.
- Subaru Forester has longer struts to suit 2 inch lifted Brumby.
- Early Subaru Liberty has the correct height struts for non-lifted Brumby. However, it has the wrong springs and top spring hats.
- Early Subaru Impreza, Liberty, and Forester should have the correct length CV shafts for an L-series. (CV joint may need modification depending on your gearbox)
- Subaru Liberty and Impreza complete strut assemblies are both the correct height. The springs and spring hat diameter don’t matter for an L-series.
- Subaru Forester and Outback have suitable front struts for a lifted L-series.
- Special attention needs to be made when finding a donor brake master cylinder to fit an L-series. The L-series master cylinder uses 3 ports if it has a hill holder (non-ABS SF Forester is a good match). If it does not have a hill holder you need to use a 4-port master cylinder. (non-ABS Liberty and Impreza is a good match)

How To Do It?
Rear Hubs/Brakes
For the rear, you will be removing the entire rear brake assembly from the swing arms on the Brumby or L-series. It is all removed with relatively little effort by removing the axle nut from the drum, 3x 14mm bolts and the metal brake line on each side.
Fitting the EJ brake backing plate to the EA swing arms requires the drilling of new mounting holes in the EJ plate. It is important that the orientation of the plate is correct otherwise the EJ calliper may foul on the swing arm when installed.
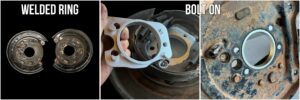
Special care must be taken to make sure the EJ plate is centred on the rear bearing housing. Some people weld a centring ring to the backing plate to achieve this. If engineering is required we discourage using any welding technique.
The Subarino kit includes bolt-on adaptors that are also used as a template to make the modifications. They both centre and set the orientation of the EJ backing plate for the best fit without welding. This technique has been known to pass engineering.
The rear brake hubs need to be from the rear of a Subaru XT6 (from the USA) or replicas. These are 5×100 stud patterns and suit the EJ brake rotor. They also amazingly share the same inner axle spline as a Subaru Brumby and L-series making them the perfect part for the job. Several people have made replica hubs over the years. The Subarino Kit includes custom hubs for the job so finding rare hubs is no longer an issue.
Some people have even machined down the old drum and re-drilled them to suit 5×100. I am yet to meet an engineer who hasn’t been shocked by this idea. We strongly discourage you from doing this for your safety and others.
The replacement hubs bolt up the same as the drums you removed using the centre hub nut with the cone washers and flat washers. Once on, the “floating” style EJ brake rotor slides straight onto the hubs as they did on the donor car. The brake callipers now bolt up exactly like they did on the EJ donor.
The brake hoses need to be plumbed between the old brake hose and the new brake callipers. This can be done by getting a custom brake hose made up. Don’t forget you will need to support the brake line so it cannot move and rub on the wheels. L-series follows the same method for the rear as above. The Subarino Kit includes hoses and mounts.
Note: This will need to be disassembled to install the hand brake cable later.
Handbrake
You may have noticed by now that the EJ hand brake is on the rear wheels and not the front wheels like on a standard Brumby or L-series. Something needs to be done to the handbrake cable and mechanism to make it work with the EJ system. This can be done in a few ways.
Your options are:
- Drill holes in the body to run the cable back through the tunnel and use the factory EJ hand brake assembly. You may need to use the entire leaver system or customise something. Others in the past have used the hand brake leaver from a 1984-87 Honda Civic.
- Don’t use a handbrake. (not recommended)
- The Subarino kit comes with a custom hand brake cable and mountings keeping the factory look in the car and does not require large holes to be made in the body.
L-series is the same as a Brumby except people commonly used Mitsubishi Magna TN hand brake leavers as they are a better fit. The Subarino hand brake set-up has not been tested on an L-series yet.
Front Hubs/Brakes
To make the front work you will be changing out your front brakes, shocks, knuckles, hubs, CV axles, and lower ball joints. You will then be installing the EJ donor gear in its place. (Excluding the CV axle.) See the chapter on “CV axles”
Your lower control arm will need to be modified/reamed to accept the EJ ball joint. The old Brumby ball joint has a 7° taper hole and the EJ ball joint needs a 10° taper hole. Most machine shops can do this for you, or we can do it for you at Subarino. Once that is done the EJ ball joint and steering knuckle is a direct bolt in fit to the control arms. The factory Brumby tie rod ends also now bolt directly to the EJ steering knuckle.
Use the EJ front brake hoses from your donor vehicle or match them to the struts used. These should be the length you require and bolt directly to the Brumby metal brake line inside the wheel well. If using lowered suspension, it’s best to check the brake lines don’t touch the wheels during normal operation.
L-series is the same as a Brumby except you will need to fit Brumby steering rack ends to your L-series steering rack. This is so the wheels can be correctly aligned after installation. Obviously, the same control arm modification is done to your L-series control arm to fit the EJ ball joint as above.

Front Shocks
The front shocks are tricky. There are a lot of different height EJ struts depending on the donor vehicle.
Basically, you want:
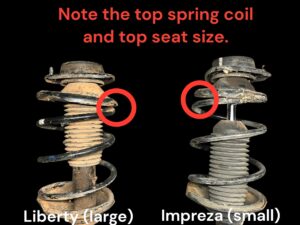
- Impreza/Liberty height struts. (These are the correct heights)
- Impreza/Forester springs and spring top hat. (These have the correct smaller top coil for clearance)
- Springs rated to suit your application. The factory EJ spring rate is usually ideal and a good starting point. (approx 140 lb/in) Cars equipped with bull bars, EJ engines, etc. may need a stiffer spring to retain your ride height. (See compatibility guide for options)
With the strut tops you have 2 options. Either drill new holes in the body’s strut tower to mount the 3-stud EJ strut top or modify the original 2-stud Brumby strut tops to fit on the EJ strut assembly. We prefer the latter. Drilling out the Brumby strut top centre hole and fitting a suitable bearing in between the strut and upper spring hat is all that is required. A suitable bearing and seal are included in the Subarino kit.
IMPORTANT: All factory EJ strut/spring arrangements are known to foul on the body and require some peining inside the wheel well where the spring rubs. You should check this during installation and make the required space. If this isn’t something you are willing to do, then investigate using aftermarket coilovers which usually have a smaller diameter spring.
L-series owners will find the EJ strut top bolt pattern almost fits directly into their car. No strut mods are required but you still need to choose the appropriate height shock and spring to suit your application. You will also notice a lot of extra room for the larger top spring seat which will increase your spring and strut choices. EG: Liberty struts/springs can be used for non-lifted and Outback struts/springs can be used for a 2-inch lifted L-series.
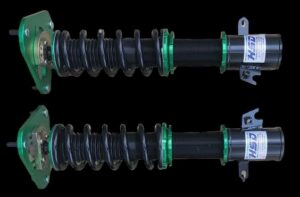
Aftermarket coilovers: Commonly used for lowering and race applications, the narrower springs give the clearance needed to not scrub the body. Most brands also offer caster and camber adjustments, some even have height adjustments. Note: You will still need to make modifications to either the car or strut tops for them to bolt in as it is likely they will come in the 3-bolt EJ arrangement. These should be a direct fit for the L-series.
2-inch lift kit: If you have a 2-inch lift kit you need to change up what you do with the front shocks. Below is the strut recipe that we recommend if you are doing a 5-stud with a 2-inch lift kit. Note: You will not be using the strut top extensions on your front struts that come with lift kits.
- Subaru Forester (SF or SG) or Subaru Outback struts (these are approximately 1 inch longer than Impreza and Liberty.
- Small Spring top hat. (see compatibility guide)
- Springs with smaller top coils to suit small spring hats. (see compatibility guide)
- Mitsubishi top hat (Part Number KELPRO 24205 or KYB KSM7118) These are a direct fit to the EJ shocks and the Subaru Brumby body. It will gain you another approximately 1-inch overall strut length.
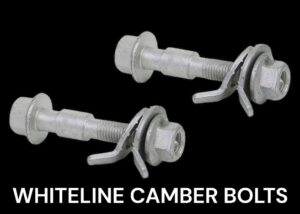
- Do not worry about your strut offset that was built into your lift kit tops, your camber adjustment on the new EJ knuckle should accommodate. If for some reason it doesn’t, then camber bolts (to suit EJ vehicles) are available with more offset from Whiteline, Nolathane and many other manufacturers.
IMPORTANT: As with non-lifted conversions, all EJ strut/spring arrangements are known to foul on the body and require some peining inside the wheel well where the spring rubs. You should check this during installation and make the required space. If this isn’t something you are willing to do then look into using aftermarket coilovers.
Subaru L-series owners should find that using the longer EJ shocks (Subaru Forester or Outback) in conjunction with some stiffer springs will get you the height you need. Alternatively, you could use the shorter (Subaru Impreza or Liberty) struts in conjunction with L-series strut top extensions. This can be achieved by slotting the lift kit extensions to suit the EJ strut tops or swapping the EJ strut tops with the L-series tops. These are a direct swap.
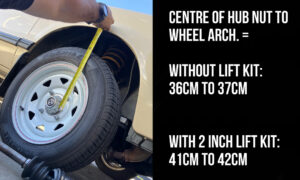
Ride Height: After messing with your suspension, it is important your ride height is correct after installation. With your wheels on the ground, you should see no greater than 36-37cm between the centre of your hub nut and the bottom of your wheel arch. If you have a 2-inch lift kit this should be no greater than 41-42cm. Any higher you are at huge risk of premature CV failure. It is not uncommon for brand-new springs to settle and drop a further 1cm after allowing them to “settle” over a week or 2. If you are running lowered springs this is of no concern to you.
Front CV Joints/Axles
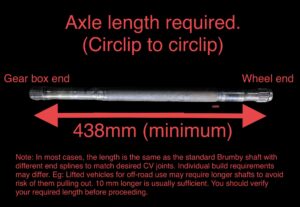
Perhaps the most complicated part of this conversion is your front CV axles. These now must be customised and how you go about this will depend on your gearbox. Unfortunately, the donor car’s CV axles are far too long for a Brumby and they need to be shortened.
Brumby Options are: (Beware the best option may change depending on the gearbox you are using)
- Re-spline the Brumby shaft: Use a Brumby shaft and get it re-splined to accept the EJ outer CV joints. Your inner CV axle spline may also need changing if you’re using the EJ gearbox. This should be your cheapest option if you can find a place that can do it.
- Re-manufactured shaft: Choose whatever splined ends you want to suit your CV joints and get a new shaft made from scratch. This is the most expensive option if you can find a place to do it. Brintech Customs are a great place to get these done and can be found here at www.brintechcustoms.com.au
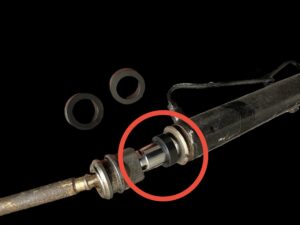
- Shorten EJ shaft to size: Use an EJ shaft and get it shortened. Leave the outer spline as it is and get the gearbox end re-splined to suit. Apparently simply cutting the middle of the shaft out and rewelding is not an option. The EJ shaft diameter may make this NOT an option for you.
- Locate some rare and elusive 22 spline shafts. These were fitted from the factory to the early 2WD Subaru Leones with an EA81 engine. If you get lucky finding a set of these can save you a heap of money. You can then use EJ “22” tooth spline CV joints inner and outers available online.
We recommend consulting with your local CV/axle experts before deciding on what to do, they may have options not discussed here.
L-series guys and girls are in luck. Most early EJ models have shafts that are a similar length to what you need. This usually avoids the need for custom shafts. Depending on your gearbox, you may need to play around with some different inner CV joints or mix and match the outer cups to suit your gearbox spline.
Steering Restriction
Depending on your rim/tyre combination you may need to limit the steering end stops to prevent your wheels touching the body at full lock. This can be common when using rims with a higher positive camber (wheels more inside the guards.) – See the “WHEELS” chapter here.
You can restrict the rack end stops (assuming you are happy with your rim offset) by inserting spacers on the steering rack between the rack/pinion and the steering rack ends. This is located under the steering rack boots. They are not always required and you won’t know for sure if you need them until the steering is tested. The more negative your wheel offset (sits out of the body) the less likely you will need these – See the “WHEELS” chapter here.
L-series guys are in luck, you do not need these. Clearance isn’t usually an issue however it still should be checked. It is also worth noting that L-series steering racks require Brumby steering rack ends to be installed to get the wheel alignment correct.
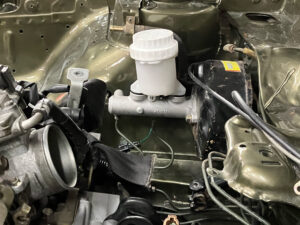
Brake Master Cylinder
Although optional, it is something that really should be done to finish off your brake upgrade. Some report no ill effects from not changing the original master cylinder, whereas others have issues with the brakes engaging too low on the pedal stroke. This can result in the brakes feeling “grabby” and locking up easily when applying the pedal. It is also a requirement by most engineers that the internal bore size and reservoir capacity must match the rest of the braking system. Lucky for us almost all EJ master cylinders have a 1-inch bore so we can swap and change to the master cylinder that fits best.
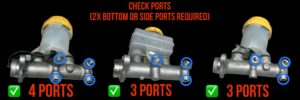
To make this work it’s important that your original master cylinder has a combination of at least 2 ports either facing downward or sideways. Top-facing ports are not easily usable. This may mean that your donor vehicle’s master cylinder may not be suitable and a new one will need to be purchased. The Subarino kits include fittings to make the more common side-facing ports work and blanks for additional ports that are not required.
The EJ master cylinders are a direct bolt-on swap to your Brumby brake booster however the metal brake lines will need some minor work. Luckily the metal lines between the factory cylinder and the proportioning valve have plenty of slack so they are easily manipulated for bottom ports or converted into side ports via adaptors. Custom metal hoses could also be made if required. Any additional ports not required need to be blanked and sealed.
Tip: It can be easier to bolt the metal line to the master cylinder first before pushing it back and against the brake booster. This will allow the fittings to stay straight and the pipes to naturally bend where required.
If you need to buy a new master cylinder, try using one from an early EJ without ABS brakes. Aftermarket part numbers JB6073 or JB6027 should be a direct fit and have the ports required.
For L-series, you need to be aware of your current brake system. Brakes with a hill holder have 3 ports on the master cylinder, 2 on the sides and one on the bottom (front). If you do not have a hill holder you have 4 ports. 2 on the side and 2 on the bottom. You will need to match the port locations with a suitable EJ replacement. A 4 port master cylinder could be used for all L-series models using a blank to plug the unused port if not needed. The JB6073 is a good match.
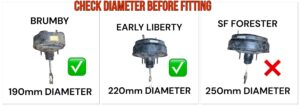
Brake Booster
The brake booster controls how easy the pedal feels to press. It does not make the world of difference so if your donor vehicle’s booster isn’t compatible, don’t stress.
There isn’t much space for an upgrade but the early model boosters from Liberty’s and Impreza’s can be made to fit. Check the diameter of the brake booster before attempting to upgrade. Some engine bay peining to make space may be required.
It’s easy to work out what needs to be done when you have your old brake booster next to the new one. Swapping and adjusting some of the linkages between the pedal and the push rod is all that’s required in most cases. Other than that, the EJ booster bolts into the factory Brumby position on the firewall.
For L-series, what fits has not been tested and you will have to check your own clearance and take your own measurements.
Wheel Selection
The wheels you choose can be somewhat complicated. There are lots of choices and it’s important you choose the correct one. 5×100 stud pattern is found on some models Subarus, VW, AUDI and more. All of these have a variety of diameters, widths and offsets. Below shows how to measure the stud pattern (commonly referred to as the PCD) to confirm their fitment.

There are several important factors that need to be considered when choosing your rim and tyre sizes. Below we discuss them.
- The rim diameter must be large enough to clear the brakes you have installed. For example, WRX brakes are larger and may not clear a 15-inch rim. In this case, a large diameter rim will need to be chosen. The early Liberty brakes however are likely to clear without issues. Different brand rims also have a different amount of internal rim clearance. So a 15-inch rim in one brand might scrub on the caliper and another might not.
- Other than the brake calliper clearance, the rim diameter plays nearly no bearing on whether it will fit or not. What is important is your overall tyre diameter. For example, you can get a 15-inch rim and tyre with the same rolling diameter as a 19-inch rim and tyre. It’s more about the tyre size than the rim diameter itself. This makes it possible to go with a standard rolling diameter tyre on almost any size rim without affecting your gearing and speedo readings. For anyone with a lift kit, you can clearly go for a larger rolling-diameter tyre. Up to 27-inch tyres are common on lifted Brumbys and L series.
- Perhaps the most important limiting factor when choosing your wheels is the rim offset. Offset is the distance between the hub mounting surface to the centreline of the wheel. (usually measured in millimetres). Zero offset means the hub bolts on directly in the middle of the rim. The more positive the offset the more your wheels will sit in from the hub. This increases the chances of the tyre scrubbing at full steering lock and hitting suspension components. The more negative your offset the more your tyres will sit out from the hub increasing the chances of the wheels sticking out past the guards.
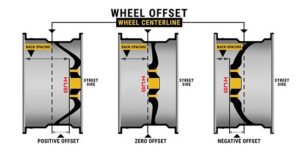
- To complicate this more, the width of the rim will also influence how far out the wheel will sit. For example, a +30 rim that is 6 inches wide won’t stick out from the hub as far as a +30 rim that is 8 inches wide. This is because the measurement is taken from the centre line of the rim and not the outside or inside edges of the rim.
- In our Brumbys, a +30 to +35 offset is close to being perfect. As you get closer to 0 (common with offroad rims) the tyres will poke out from the guards. As you get closer to +55 (common with WRXs) the tyres will sit too far in and may scrub on suspension components. Again, this can all depend on the overall width of the rim.
- TIP: Some rims have the offset, rim width and diameter engraved into them. The “ET” stands for Einpress Tiefe in German and is the offset measurement in millimetres.
Confused yet? It is confusing and you may have to experiment with some different rims before blowing money on tyres. It is worth mentioning that wheel spacers do exist but we cannot recommend them. For obvious reasons, wheel spacers are illegal in most countries and can be very dangerous if they fail. Using spacers can put the safety of you and other road users at risk and should be avoided.
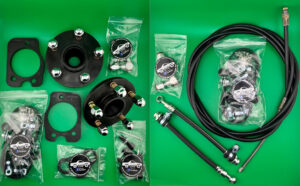
How We Can Help You
The good news, we sell a kit with almost everything you need (excluding the donor vehicle parts and CV axles required). We even have fitting instructions to help get it all happening. It has been designed to suit a Subaru Brumby but as you have seen above the same principles apply to the L-series and most of the kit will cross over, which you can find here.
We have done our best to share both relevant and accurate information on this page. If you find something not accurate, please let us know by contacting us.